【前面的话】书接上文,本文的某些知识依赖我的上一篇SpringCLoud的文章:SpringCloud之Feign,如果没有看过可以先移步去看一下。前文提到了hystrix的应用,以及hystrix的监控,当时我们在实际生产过程中往往会在多个服务中或者说网关集群中使用hystrix,这样我们来监控的是否再去分别查看当时的每个应用的话,效率就会显得很低下呢,这里我们就要用的上文提到的集群监控了。
壹、Turbine的简介
看单个的Hystrix Dashboard的数据并没有什么多大的价值,要想看这个系统的Hystrix Dashboard数据就需要用到Hystrix Turbine。Hystrix Turbine将每个服务Hystrix Dashboard数据进行了整合。Hystrix Turbine的使用非常简单,只需要引入相应的依赖和加上注解和配置就可以了。
简而言之:Turbine就是聚合监控多个Hystrix Dashboard的数据。
贰、准备工作
新建一个feign子工程lovin-cloud-turbine,用于后面的操作。下面是主要的pom依赖:
1
2
3
4
5
6
7
8
9
10
11
12
13
14
15
16
17
18
19
20
21
22
23
24
25
26
27
28
29
30
31
32
33
34
35
36
37
38
39
40
41
42
43
44
45
46
47
48
49
50
51
52
53
54
55
56
57
58
59
60
61
| <parent>
<artifactId>lovincloud</artifactId>
<groupId>com.eelve.lovincloud</groupId>
<version>1.0-SNAPSHOT</version>
</parent>
<modelVersion>4.0.0</modelVersion>
<artifactId>lovin-cloud-turbine</artifactId>
<packaging>jar</packaging>
<name>lovincloudturbine</name>
<version>0.0.1</version>
<description>turbine监控</description>
<dependencies>
<dependency>
<groupId>org.springframework.cloud</groupId>
<artifactId>spring-cloud-starter-netflix-eureka-client</artifactId>
</dependency>
<dependency>
<groupId>org.springframework.boot</groupId>
<artifactId>spring-boot-starter-security</artifactId>
</dependency>
<dependency>
<groupId>org.springframework.boot</groupId>
<artifactId>spring-boot-starter-web</artifactId>
</dependency>
<dependency>
<groupId>de.codecentric</groupId>
<artifactId>spring-boot-admin-starter-client</artifactId>
<version>2.1.6</version>
</dependency>
<dependency>
<groupId>org.springframework.cloud</groupId>
<artifactId>spring-cloud-starter-turbine</artifactId>
<version>1.4.7.RELEASE</version>
</dependency>
<dependency>
<groupId>org.springframework.cloud</groupId>
<artifactId>spring-cloud-netflix-turbine</artifactId>
</dependency>
<dependency>
<groupId>org.springframework.boot</groupId>
<artifactId>spring-boot-starter-actuator</artifactId>
</dependency>
<!--
<dependency>
<groupId>org.springframework.cloud</groupId>
<artifactId>spring-cloud-starter-turbine-amqp</artifactId>
<version>1.4.7.RELEASE</version>
</dependency>
-->
</dependencies>
<build>
<plugins>
<plugin>
<groupId>org.springframework.boot</groupId>
<artifactId>spring-boot-maven-plugin</artifactId>
</plugin>
</plugins>
</build>
|
- 这里为了安全,我这里还是添加spring-boot-starter-security
1
2
3
4
5
6
7
8
9
10
11
12
13
14
15
16
17
18
19
20
21
22
23
24
25
26
27
28
29
30
31
32
33
34
35
36
37
38
| server:
port: 8808
spring:
application:
name: lovincloudturbine
security:
basic:
enabled: true
user:
name: lovin
password: ${REGISTRY_SERVER_PASSWORD:lovin}
eureka:
client:
serviceUrl:
defaultZone: http://lovin:lovin@localhost:8881/eureka/
instance:
leaseRenewalIntervalInSeconds: 10
health-check-url-path: /actuator/health
metadata-map:
user.name: lovin
user.password: lovin
management:
endpoints:
web:
exposure:
include: "*"
endpoint:
health:
show-details: ALWAYS
turbine:
aggregator:
clusterConfig: default
appConfig: lovinfeignclient,lovinribbonclient
clusterNameExpression: new String("default")
|
- 配置spring-boot-starter-security,这里为了方便我这里放开所有请求
1
2
3
4
5
6
7
8
9
10
11
12
13
14
15
16
17
18
19
20
21
22
| package com.eelve.lovin.config;
import org.springframework.context.annotation.Configuration;
import org.springframework.security.config.annotation.web.builders.HttpSecurity;
import org.springframework.security.config.annotation.web.configuration.WebSecurityConfigurerAdapter;
@Configuration
public class WebSecurityConfig extends WebSecurityConfigurerAdapter {
@Override
protected void configure(HttpSecurity http) throws Exception {
http.authorizeRequests().anyRequest().permitAll()
.and().csrf().disable();
}
}
|
- 在主类上添加**@EnableTurbine**,当然也需要注册到注册中心:
1
2
3
4
5
6
7
8
9
10
11
12
13
14
15
16
17
18
19
20
21
22
23
24
| package com.eelve.lovin;
import org.springframework.boot.SpringApplication;
import org.springframework.boot.autoconfigure.SpringBootApplication;
import org.springframework.cloud.client.discovery.EnableDiscoveryClient;
import org.springframework.cloud.netflix.turbine.EnableTurbine;
import org.springframework.cloud.netflix.turbine.stream.EnableTurbineStream;
@SpringBootApplication
@EnableDiscoveryClient
@EnableTurbine
public class LovinCloudTurbineApplication {
public static void main(String[] args) {
SpringApplication.run(LovinCloudTurbineApplication.class,args);
}
}
|
- 改造lovin-feign-client,使之变成集群,添加第二份配置文件
叁、启动测试
- 依次启动eureka的服务端和两个客户端,以及lovin-feign-client、lovin-ribbon-client和新建的lovin-cloud-turbine
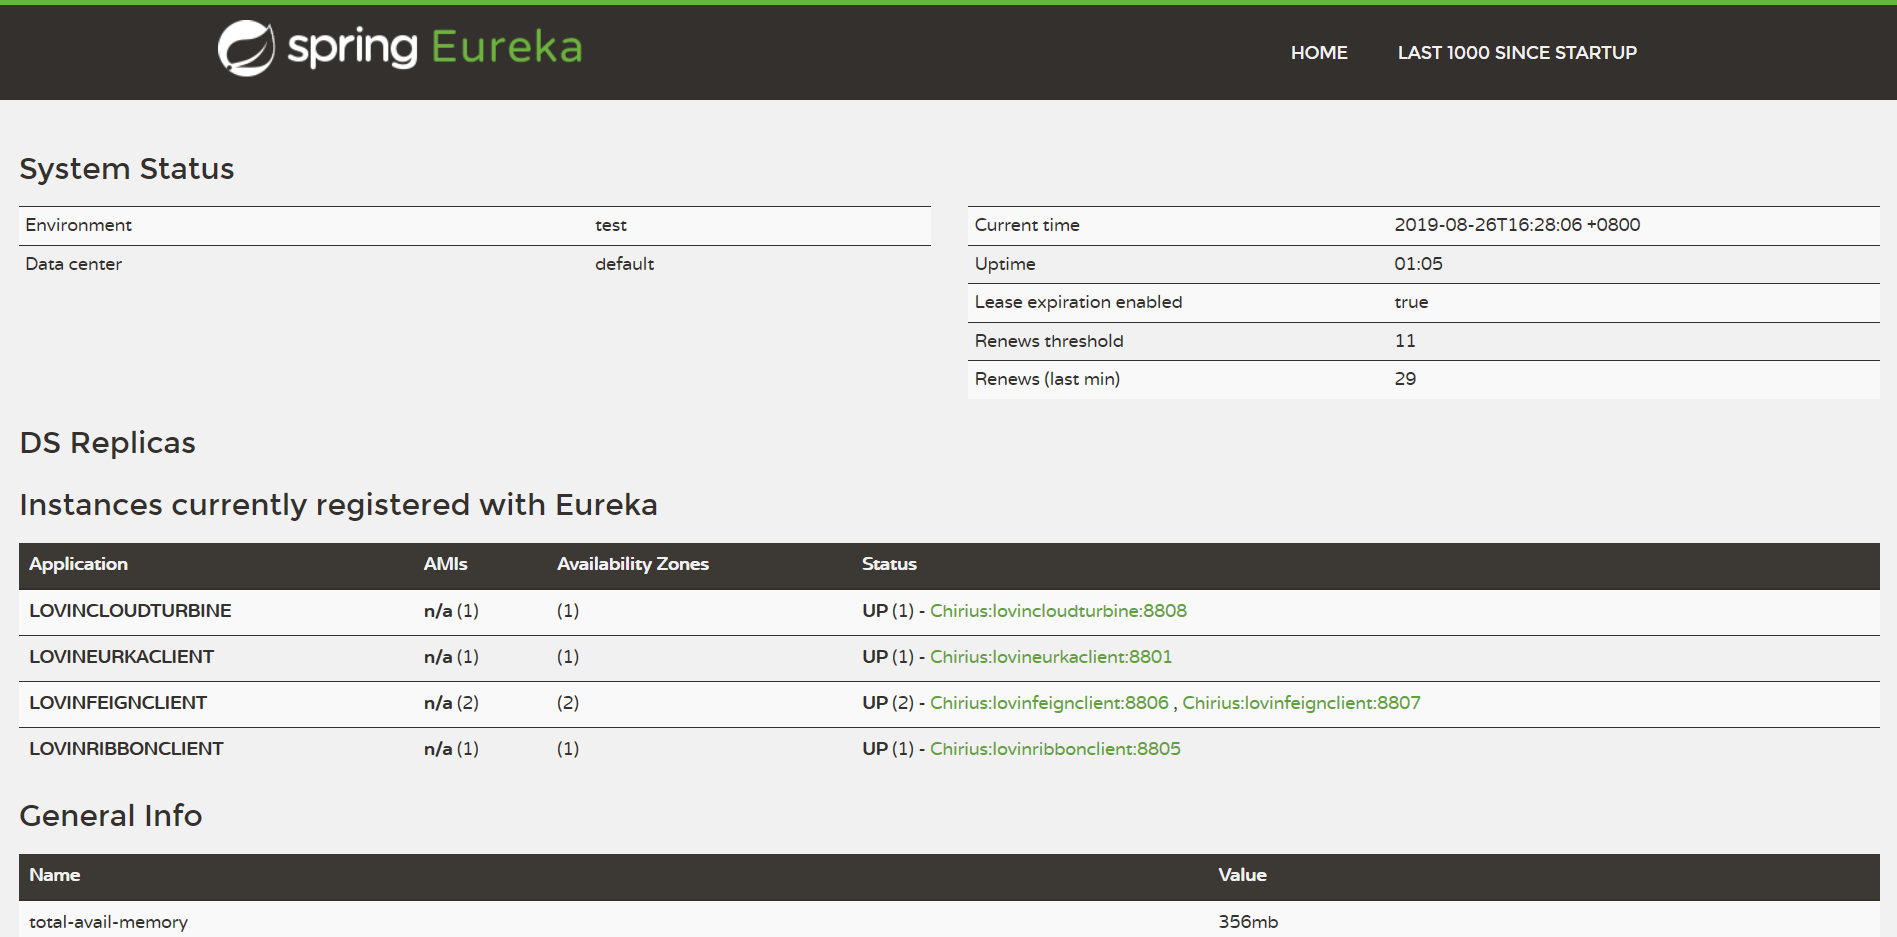
我们可以看到服务已经全部启动成功
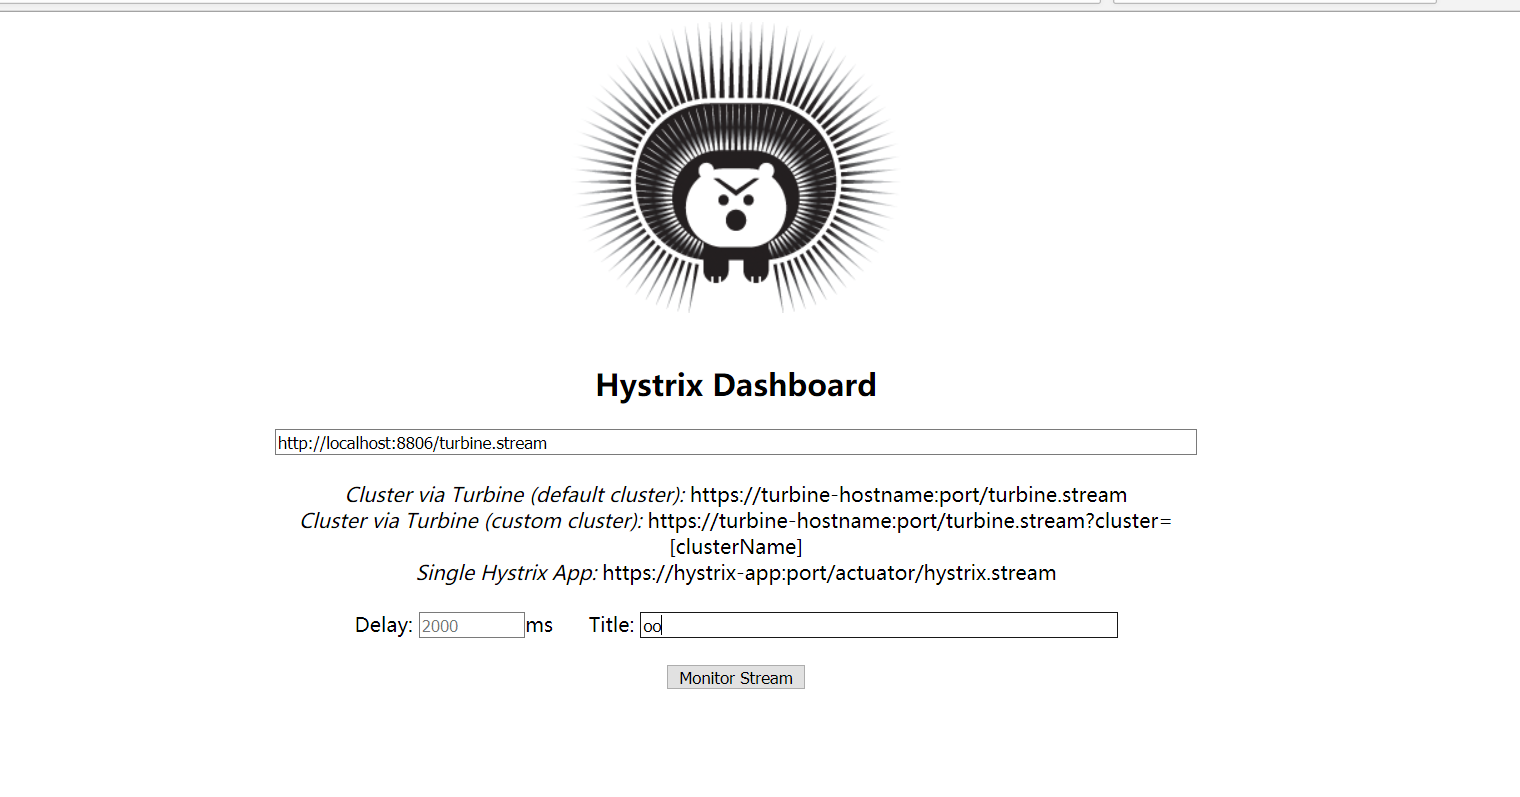
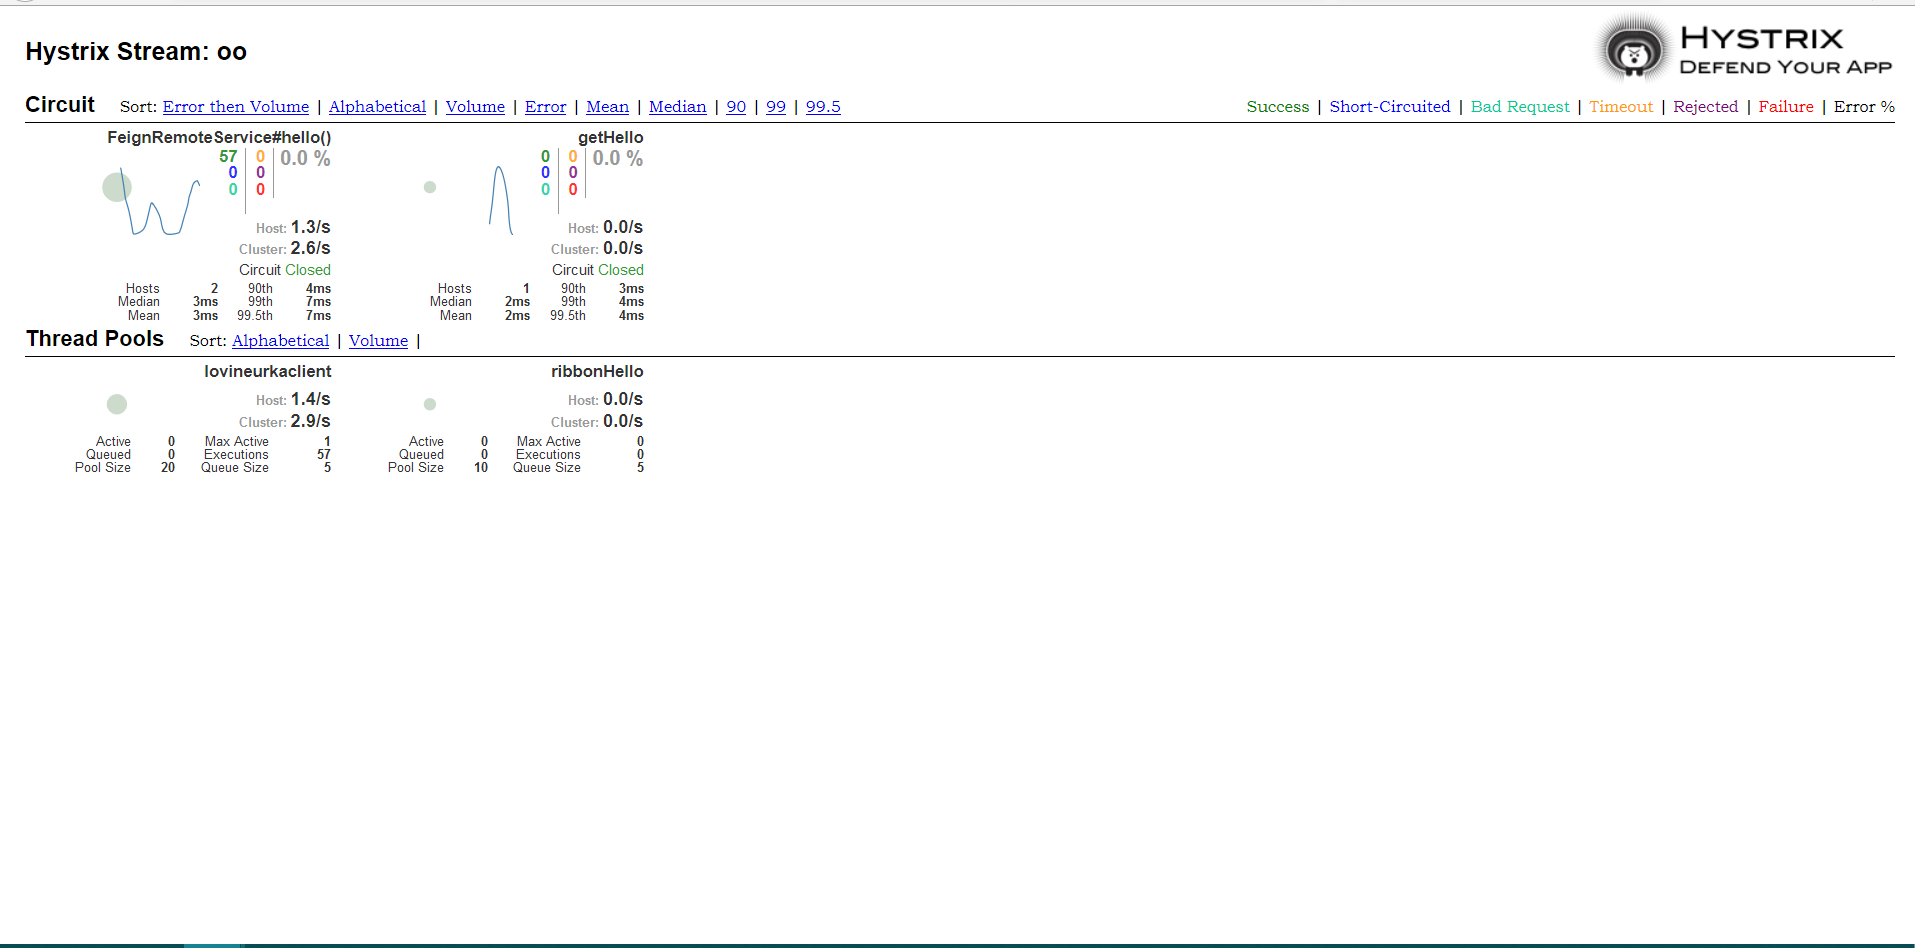
肆、消息队列来做到异步监控
turbine服务端修改
1
2
3
4
5
6
7
8
9
10
11
12
13
14
15
16
17
18
19
20
21
22
23
24
25
26
27
28
29
30
31
32
33
34
35
36
37
38
39
40
41
42
43
44
45
46
| <dependencies>
<dependency>
<groupId>org.springframework.cloud</groupId>
<artifactId>spring-cloud-starter-netflix-eureka-client</artifactId>
</dependency>
<dependency>
<groupId>org.springframework.boot</groupId>
<artifactId>spring-boot-starter-security</artifactId>
</dependency>
<dependency>
<groupId>org.springframework.boot</groupId>
<artifactId>spring-boot-starter-web</artifactId>
</dependency>
<dependency>
<groupId>de.codecentric</groupId>
<artifactId>spring-boot-admin-starter-client</artifactId>
<version>2.1.6</version>
</dependency>
<dependency>
<groupId>org.springframework.cloud</groupId>
<artifactId>spring-cloud-starter-turbine</artifactId>
<version>1.4.7.RELEASE</version>
</dependency>
<dependency>
<groupId>org.springframework.cloud</groupId>
<artifactId>spring-cloud-netflix-turbine</artifactId>
</dependency>
<dependency>
<groupId>org.springframework.boot</groupId>
<artifactId>spring-boot-starter-actuator</artifactId>
</dependency>
<dependency>
<groupId>org.springframework.cloud</groupId>
<artifactId>spring-cloud-starter-turbine-amqp</artifactId>
<version>1.4.7.RELEASE</version>
</dependency>
</dependencies>
<build>
<plugins>
<plugin>
<groupId>org.springframework.boot</groupId>
<artifactId>spring-boot-maven-plugin</artifactId>
</plugin>
</plugins>
</build>
|
可以看到这里主要引入了spring-cloud-starter-turbine-amqp依赖,它实际上就是包装了spring-cloud-starter-turbine-stream和pring-cloud-starter-stream-rabbit。
1
2
3
4
5
6
| spring:
rabbitmq:
host: 127.0.0.1
port: 5672
username: guest
password: guest
|
- 在应用主类中使用@EnableTurbineStream注解来启用Turbine Stream的配置
1
2
3
4
5
6
7
8
9
10
11
12
13
14
15
16
17
18
19
20
21
22
23
24
| package com.eelve.lovin;
import org.springframework.boot.SpringApplication;
import org.springframework.boot.autoconfigure.SpringBootApplication;
import org.springframework.cloud.client.discovery.EnableDiscoveryClient;
import org.springframework.cloud.netflix.turbine.EnableTurbine;
import org.springframework.cloud.netflix.turbine.stream.EnableTurbineStream;
@SpringBootApplication
@EnableDiscoveryClient
@EnableTurbineStream
public class LovinCloudTurbineApplication {
public static void main(String[] args) {
SpringApplication.run(LovinCloudTurbineApplication.class,args);
}
}
|
对服务消费者进行修改
- 添加spring-cloud-netflix-hystrix-amqp依赖
1
2
3
4
5
| <dependency>
<groupId>org.springframework.cloud</groupId>
<artifactId>spring-cloud-netflix-hystrix-amqp</artifactId>
<version>1.4.7.RELEASE</version>
</dependency>
|
1
2
3
4
5
6
| spring:
rabbitmq:
host: 127.0.0.1
port: 5672
username: guest
password: guest
|
然后重启服务之后,就可以再次看到监控详情


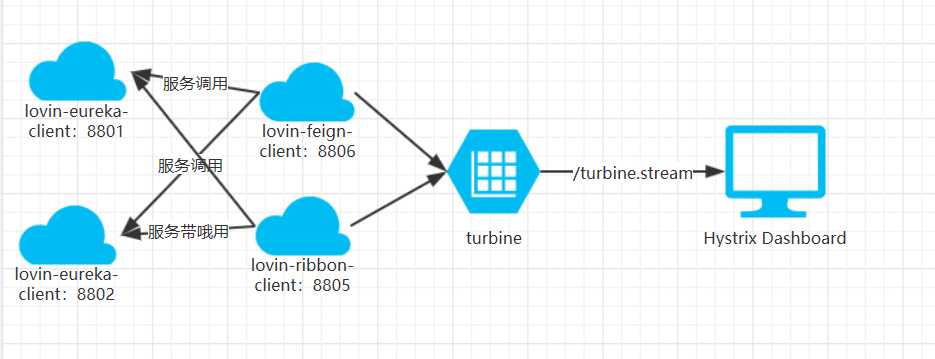
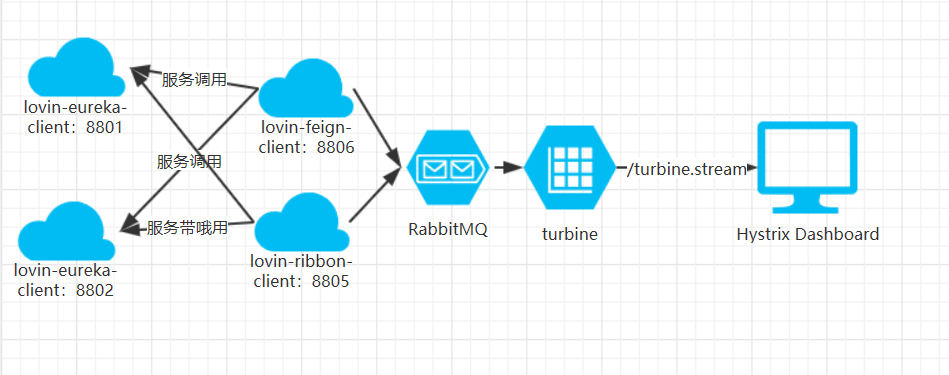
伍、监控数据流图
- 我们可以看到我们调用的服务不再是像再上一篇文章中的直接访问对应的服务,而是通过feign的Ribbon的负载均衡的去调用的,而且这里说明一点,Ribbon的默认机制是轮询。
- 直接使用Turbine监控
- 使用RabbitMQ异步监控
陆、Turbine详解
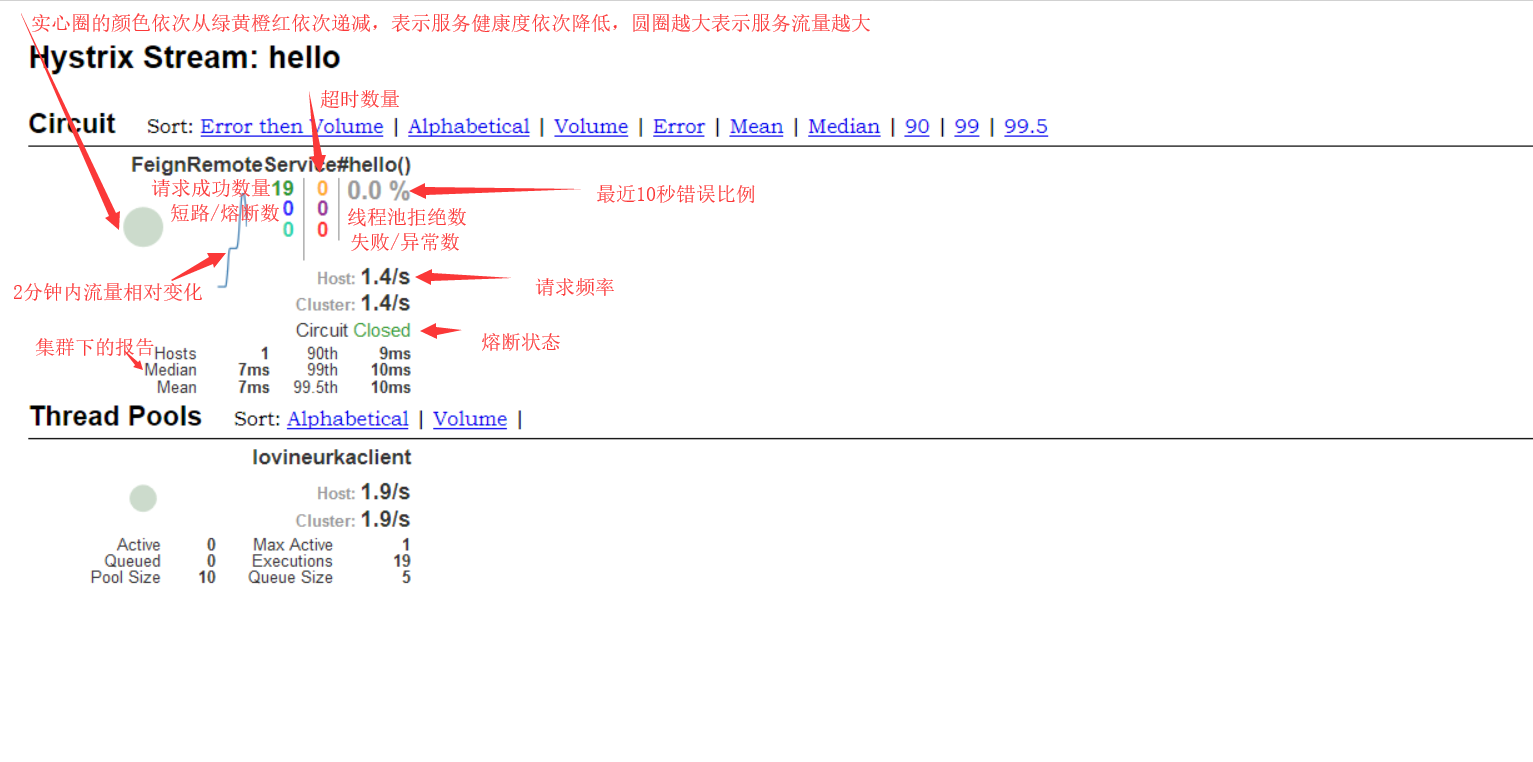
- 我们可以在监控信息的左上部分找到两个重要的图形信息:一个实心圆和一条曲线。
1、实心圆:共有两种含义。它通过颜色的变化代表了实例的健康程度,如下图所示,它的健康度从绿色、黄色、橙色、红色递减。该实心圆除了颜色的变化之外,它的大小也会根据实例的请求流量发生变化,流量越大该实心圆就越大。所以通过该实心圆的展示,我们就可以在大量的实例中快速的发现故障实例和高压力实例。
2、曲线:用来记录2分钟内流量的相对变化,我们可以通过它来观察到流量的上升和下降趋势。


